How to Connect Fan to Raspberry Pi 4
By Jeremy S. Cook
Freelance Tech Journalist / Technical Writer, Engineering Consultant
Jeremy Cook Consulting
March 15, 2021
Blog
As you probably know, Raspberry Pi single-board computers, especially Pi 4 models, can get quite hot.

(Image Credit: Jeremy Cook)
While passive cooling options are often good enough to avoid overheating and thermal throttling–and I do love a ridiculously oversized heat sink–at some point you'll need to think about using a cooling fan. The problem is that the Raspberry Pi's GPIO pins don't supply enough power to get one going.
One alternative is to hook the fan up to a 5V and ground pin, and just have it run continuously. However, this seems slightly wasteful power-wise, and potentially quite annoying. As outlined previously, you can also use a transistor and temperature-reactive Bash script to turn a fan on and off via the processor's temperature. Things have changed since mid-2020, however, and Raspberry Pi OS now has this functionality built-in. Making things even more convenient, if you're using a fan with a PWM input, you don't actually need to add an extra transistor!
Hardware Setup

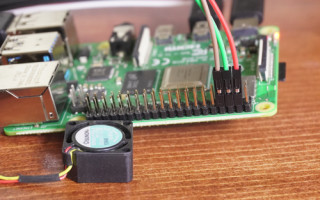
(Image Credit: Jeremy Cook)
As outlined in the video below, if you're using a PWM fan, all you have to do is connect it's power lead to one of the Pi's 5V pins, ground to ground, and the PWM lead to a GPIO pin as specified below. For simpler fans with only a power and ground input, you'll need to add a transistor to provide it with enough current. You can also use the EZ Fan2 board that I designed as a sort of plug-and-play transistor solution, including a flyback diode and current-limiting resistor.
Software Setup

Screencap (Image Credit: Jeremy Cook)
From the Raspberry Pi OS GUI, click on the Raspberry button, then select Preferences > Raspberry Pi Configuration. Click on the Performance tab, then select the Fan Enable radio button. Below this you can select the GPIO pin that you'd like to use, as well as the temperature at which it should come on. Restart and you're good to go!
Alternatively, you can set things up via the terminal. Input sudo raspi-config. Scroll down to Performance Options > Fan, and follow the prompts to enable temperature control. Select the GPIO pin, and select at which temperature it should come on (between 60 and 120ºC, which is the same on the GUI interface). It then asks you if you want to reboot, and once that is done, your fan is temperature activated.
If you'd like to test things out, you could perhaps go "brute force" with a hairdryer or similar, but a better and more convenient way would be to do a stress test. Core Electronics has a nice guide on how to do this, which I've used to verify my setup.
That Was Easy! (?)
Yes, the process is indeed that easy. No installing scripts or writing your own. Honestly, I'm surprised this functionality wasn't added long ago, but everything, of course, has to start somewhere.
The one drawback to this implementation is that it appears there is no way to get the fan to come on below 60ºC. Personally, I love setting my fan up at a lower (and likely unnecessary) temperature where the fan turns on at random-ish times. My original script to turn the fan on at whatever temperature you like is still up on GitHub, and is currently working for me. Per this closed issue, however, you may have to go through a bit of yak shaving to get it to work.
It would also be neat to have a PWM output to control the speed incrementally, though admittedly neither of these features are particularly needed. Regardless of these very minor restrictions, it's great that Raspberry Pi has added this functionality. Likely this will mean a tiny bit less energy usage, and fewer unnecessary hums!
Jeremy Cook is a freelance tech journalist and engineering consultant with over 10 years of factory automation experience. An avid maker and experimenter, you can follow him on Twitter [https://twitter.com/JeremySCook], or see his electromechanical exploits on the Jeremy S. Cook YouTube Channel! [https://www.youtube.com/c/jeremyscook]

Jeremy Cook is a freelance tech journalist and engineering consultant with over 10 years of factory automation experience. An avid maker and experimenter, you can follow him on Twitter [https://twitter.com/JeremySCook], or see his electromechanical exploits on the Jeremy S. Cook YouTube Channel! [https://www.youtube.com/c/jeremyscook]
More from Jeremy
Categories
Processing - Compute Modules
Analog & Power - Energy Harvestin & Renewables
Industrial - Smart Energy & Utilities
Software & OS - Operating Systems, Filesystems & Libraries
How to Connect Fan to Raspberry Pi 4
Source: https://www.embeddedcomputing.com/technology/processing/compute-modules/raspberry-pi-os-fan-control
0 Response to "How to Connect Fan to Raspberry Pi 4"
Post a Comment